How To Create Woodsy Handmade Cards For The Holiday Season

How to create woodsy handmade cards for the holiday season.

Woodsy Handmade Cards For The Holiday Season

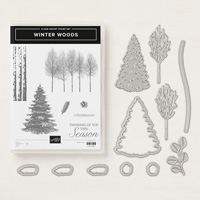
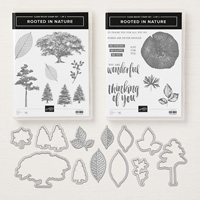
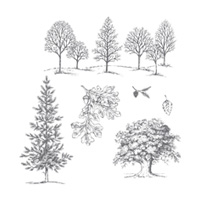
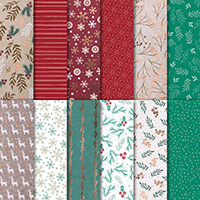
Do you love nature-inspired holiday decor with the woodsy elements of evergreens? I do.  I think it’s because the rustic scenery transports us back to a simpler time.  For this reason,  the Winter Woods Bundle has great appeal for the holidays and beyond. Not only that, but Stampin’ Up! designed this set to coordinate with their long-time, most popular ever, stamp set: Lovely as a Tree! In addition, there is also another set designed for this purpose in the 2018-19 Annual Catalog: Rooted in Nature.  Winter Woods is a new release in the 2018 Holiday Catalog that will be available beginning September 5th. To learn more about the Holiday Catalog – CLICK HERE. You can see all three sets pictured together below:

How to create this woodsy card for the holiday season

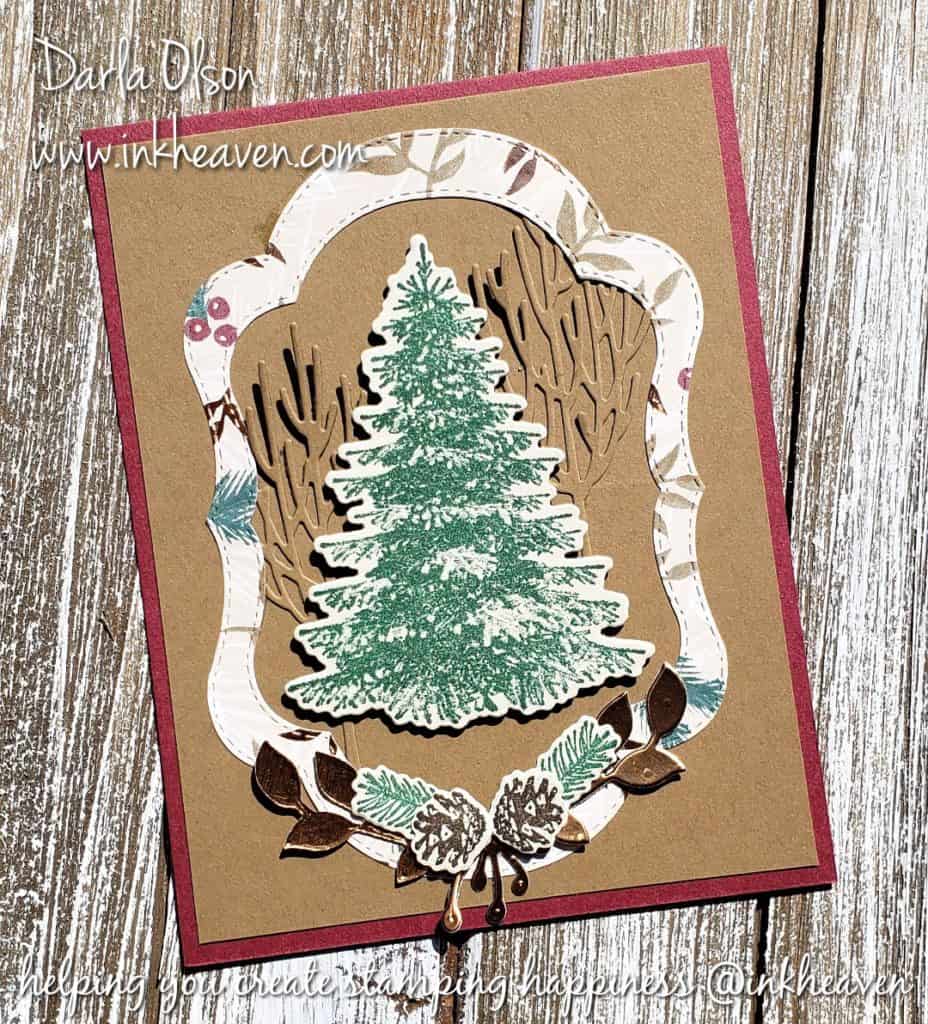
I’ve designed this card to have a woodsy look with a touch of copper elegance for the holiday season. First, I started with the Joyous Noel Specialty Designer Series Paper. This paper has plenty of evergreens and a great color combo to achieve the desired look.

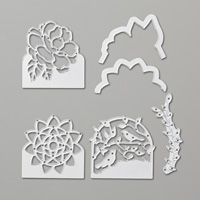
Next, I knew that I wanted only a touch of the Joyous Noel DSP on my card front to establish the color combo, so I used the Stitched Season Framelit Dies to create a frame for my focal point (the 2 largest frames were used). The touch of Joyous Noel DSP also adds a bit of Christmas to the woodsy look.

Third, I created a woodsy scene for the inside of my frame with trees. I placed the large evergreen in the forefront, with the barren trees in the background. I chose to die cut the barren trees in Soft Suede card stock. This adds texture to the Soft Suede background. I stamped the evergreen on Sahara Sand card stock rather than Whisper White.  I then placed the evergreen over the top of the barren trees with Stampin’ Dimensionals to hold them in place.

Fourth, I adhered the Joyous Noel DSP  frame around the trees. This also helps to hold part of the barren trees down on the card.

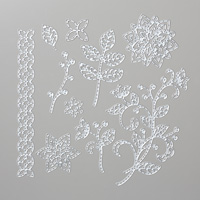
As a final touch, I created an evergreen swag to place at the bottom of the frame to bring in the look of holiday season. This also adds to the woodsy feel of the card. I layered on the elements of the swag with glue dots. However, liquid glue could also be used.

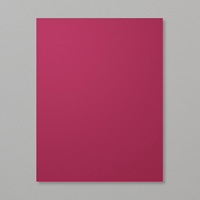
Lastly, the card front was layered on a Merry Merlot card base.

Use this clickable supply list to create this woodsy holiday season card*

*Please note that the Winter Woods and Joyous Noel items are from the Holiday Catalog and will not be available for purchase until September 5th. However, if you purchase the other items needed TODAY by 11:50 p.m. (or spend $50) you will earn a $5 bonus coupon that you can apply to your purchase in September! In addition, the Stitched Season framelits dies are a limited-time product promotion that also ends TODAY by 11:50 p.m. To learn more about these specials and offers – CLICK HERE.

Thank you for stopping by to visit. If you have any questions, or need any help creating this woodsy holiday season card, please ask! I love helping you create stamping happiness for yourself and loved ones!

Tip: The Rooted in Nature Bundle has some embossing leaf dies designed to be used with the Big Shot Embossing Mats. To learn more about those, and what else you can do with them – CLICK HERE
To see a card project created with the Rooted in Nature Bundle and get a free tutorial – CLICK HERE
Darla Olson at inkheaven wishing you stamping happiness always

Cute Snowman Card Depicts Snowman Juggling Snowflakes

Cute snowman card depicts snowman juggling snowflakes.

Cute Snowman Card Depicts Snowman Juggling Snowflakes

This cute snowman card was a make and take for my 2018 Grand Annual Open House.  When I saw this snowman from the new Spirited Snowmen stamp set in the 2018 Holiday Catalog, I just knew he had to be juggling! Because of this, I paired him with the new Blizzard Thinlit and used snowflakes popped out of the die to give him something to juggle! As a result, this happy fella wants you to send some Winter cheer to your friends and family this year!

The 2018 Holiday Catalog goes live on September 5th! To learn more – CLICK HERE!

I wanted to share this adorable snowman card with you to give you a reminder that the Limited-time Stitched Seasons Framelit Dies are only available through 11:50 pm, August 31st . Which means that there is just one more day to get these little gems! Why does it matter? The largest stitched frame in this set of dies(largest die: 4-7/8″ x 3-3/8″) is much larger than our Layering Ovals Dies (Largest image: 2-7/8″ x 3-13/16″) and Stitched Shapes Dies (largest image 3-1/4” x 2-5/16”), which will give you more options! To learn more about the Stitched Seasons Framellits Dies – CLICK HERE.

Use these supplies* (and free tutorial) to recreate this card:

*Please note that the 2018 Holiday Catalog items are not available for purchase until September 5th! However, you will want to purchase the Stitched Seasons Framelits Dies before 11:50 pm, August 31st, 2018! Stamp Set & Framelits are limited edition and will not  be seen again.  SU! demonstrators may not sell them as “retired” for a year, so get them now! The bundle earns you a $5 coupon for next month. To learn more about the bonus coupons – CLICK HERE.

Tip: The Take Your Pick Tool will be available in the 2018 Holiday Catalog and is great for helping to remove the snowflakes from the Blizzard Thinlit Die.

For the tutorial – CLICK HERE.

Please note: If you missed out getting the Stitched Seasons Framelits, you can substitute the largest oval in the Layering Oval Dies.

Stitched Seasons Framelits Dies
$33.00


Specials and Offers – CLICK HERE

Happy Shopping @inkheaven
Thank you for shopping with me @inkheaven

Thank you for stopping by to visit. If you have any questions, or need any help creating this cute snowman card with the snowman juggling snowflakes, please ask! I love helping you create stamping happiness for yourself and loved ones! If you enjoyed this post, you may also enjoy this post about using Embossing Mats to double your intricate die options (hint: the Blizzard Thinlit Die looks amazing embossed!) – CLICK HERE

Darla Olson at inkheaven wishing you stamping happiness always

How To Inlay Your Intricate Dies For A Mosaic Art Look

Watch this video to learn an easy trick to help you inlay intricate dies for a mosaic art look on your handmade cards.

Inlay Your Intricate Dies For A Mosaic Art Look

Inlaying your intricate dies can give your handmade cards a mosaic art look. However, inlaying small pieces on an intricate die cut can become quite tedious! In my Facebook Live video below, I show you how to use Press & Seal to make it an easy process.

In addition, on this card above I added shading to the inlays with watercolor pencils to give more depth and texture to the mosaic. I also show this in the video!

Plus, I show several other samples of cards with intricate die cut inlays and a card using just the inlay. This Facebook Live Video is raw and unedited!

Use these supplies to re-create this inlaid intricate die cut mosaic card:

(Please note – images are clickable!)

Specials and Offers – CLICK HERE

Happy Shopping @inkheaven
Thank you for shopping with me @inkheaven


Thank you for stopping by to visit. If you have any questions,or need any help creating mosaic cards with intricate die inlays, please feel free to ask! I love helping you create stamping happiness for yourself and loved ones!

Another important thing to note – the Stitched Season Framelits Dies  and Watercolor Pencils Assortment 2 are only available for a limited time while supplies last until August 31st! To learn more – CLICK HERE!

Hurry! If you purchase your supplies by August 31st – you will earn bonus coupons to spend in September when the Holiday Catalog goes live! To learn more about  Bonus Days Rewards – CLICK HERE!

If you enjoyed this post, you may also enjoy this post about using Embossing Mats to double your intricate die options – CLICK HERE

Darla Olson at inkheaven wishing you stamping happiness always