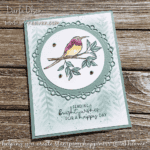
Sending Bright Wishes With Eclectic Garden
Nestle the beautiful bird from Eclectic Garden on a Soft Succulent background created with Blending Brushes and a Decorative Mask
Materials
Card Stock Dimensions
- 1 4¼" x 5½" Cardstock (card front) Soft Succulent
- 1 4" x 5¼" Cardstock (card front layer) Basic White
- 1 4½" x 4½" Cardstock (Encircled in Beauty Die Cut) Soft Succlent
- 1 3½" x 3½" Cardstock (Layering Circles Die Cut) Basic White
- 1 8½" x 5½" Cardstock (card base) Basic White
Instructions
- Place Decorative Mask over the Basic White card front layer. (Hold in place with masking tape or, if using the Stamparatus, magnets.1 4" x 5¼" Cardstock (card front layer)
- Ink up the Blending Brush with Soft Succulent ink.
- Lightly brush over the Decorative Mask. Tip: lightly brush in one direction as the decorative mask has lots of details that make it prone to moving if you do not use a light touch.
- Remove mask after obtaining desired coverage.
- Lightly stamp speckles (or dots) over the masked background in Soft Succulent ink as shown.
- Layer the Soft Succulent card front to the Basic White card base.1 4¼" x 5½" Cardstock (card front), 1 8½" x 5½" Cardstock (card base)
- Layer the Basic Whte card front layer (with the Soft Succulent background) to the Soft Succulent card front.
- Die Cut the decorative circle using the Encircled in Beauty dies from Soft Succulent card stock.1 4½" x 4½" Cardstock (Encircled in Beauty Die Cut)
- Layer your die-cut on the card front as shown.
- Die-cut a circle with the Layering Circle dies from Basic White card stock as shown.1 3½" x 3½" Cardstock (Layering Circles Die Cut)
- Stamp the bird in the circle using Tuxedo Black ink as shown.
- Color the bird with Stampin' Blends as shown.
- Layer the bird on to the card front as shown.
- Stamp the Sending Bright Wishes sentiment to the card front in Tuxedo Black in as shown.
- Add Garden Gems to the card front as shown.