Watercolor Christmas Merriest Christmas Wishes Card Tutorial

Stampin' Up! Watercolor Christmas used to create merriest Christmas wishes card by Stampin' Up!

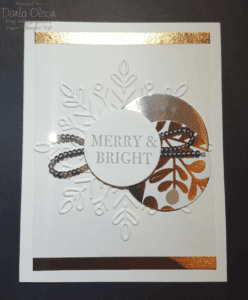
Watercolor Christmas Beyond The Kit

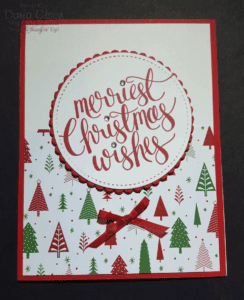
Several posts ago I promised to share the make & takes and tutorials from my Holiday Catalog Launch with you. This merriest Christmas wishes card is the last installment on that promise, finally!

I had no idea when I started the process of moving my blog at the beginning of the year, that we would be soon begin the process of moving our household across the country!  Trying to learn a new blogging platform while moving has been a challenge.  Thankfully, email and Facebook stayed the same and I relied heavily on those two platforms to keep in communication with you!

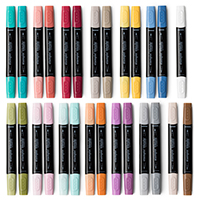
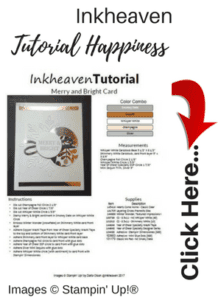
I chose this card design for one of my Holiday Catalog Launch Make & Takes for several reasons.  The first being that I really like the project kit and I had a hunch that with all the upheaval of moving, the project kit would come in handy! Secondly, I really like the stamp set. The stamp set has 3 fabulous focal point sentiments, 3 fun little accent images, and a nice sentiment for the inside of the card making it perfect for quick and easy cards! Inkheaven tutorials include a color photo, color combo, supplies list, measurements, and instructions! Download your tutorial below:

Click here to download FREE Inkheaven Tutorial

Year End Clearance

Watercolor Christmas is in the Year End Clearance  and will only be available while supplies last or until January 2nd, 2018, whichever comes first! Purchase Watercolor Christmas and other supplies needed to create this card at my online store:

Happy Shopping @inkheaven
Thank you for shopping with me @inkheaven


Thank you so much for stopping by and visiting with me. I hope you will come back soon!

Darla Olson at inkheaven wishing you stamping happiness always

Joy to the World Bridge Card

Hearts Come Home Bridge Card @ inkheaven

Bridge Card Proclaims Joy to the World

I created several card designs using the Hearts Come Home Bundle. However, this bridge card design was my favorite! I love the scene created by the design. In addition,  the Tranquil Tide color combination gives it a peaceful look. This card was designed for my November class and Party in a Box.

Bridge cards are relatively easy to make and have a couple of neat features.  One feature is that when opened, they stand up and create a 3-dimensional scene. The second cool feature is that it folds and lays flat for mailing in a standard A4 envelope.

More Hearts Come Home Designs

Below are the other two cards Christmas cards designed for my class and Party in a Box using the Hearts Come Home Bundle.

Christmas Card Using Hearts Come Home @ inkheaven

Santa and His Reindeer Hearts Come Home Card @ inkheaven

I hope you enjoyed my Christmas Cards! I hope to be creating and sharing more bridge cards ideas in the future. Thank you so much for stopping by to visit me. Please come back soon!

Merry Christmas!

Darla Olson at inkheaven wishing you stamping happiness always

Beautiful Handmade Sympathy Card Using Petal Palette Bundle

Petal Palette Bundle creates beautiful sympathy card

Handmade Sympathy Cards Are Always In Season

Creating sympathy cards during the Christmas season is not my favorite thing. However, since I needed one for the family of a very special stamping friend, I went to work creating one that I knew my friend would have loved.

Because the Petal Palette Bundle does not have any sympathy sentiments or verses, I did have to pull out another stamp set for those. In the end, I chose Flourishing Phrases. I also pulled in the Layered Leaves  Dynamic Textured Impressions Embossing Folder to add a foliage texture to the background.

Choosing a Color Scheme For My Sympathy Card

I knew that I wanted my card to be bright and cheerful because my friend was full of pluck. Furthermore, she always wore a big smile in the face of adversity! Since I was not feeling too creative when I started, I went with a color scheme that I had used before and had recently came across going through my card stash (well, the one that is not packed up in a moving box somewhere, anyway).

The color scheme is Whisper White, Lemon Lime Twist, Pink Pirouette,  Sweet Sugarplum, and Gold.  The color scheme ended up being perfect. Consequently, I was able to weave some symbolism into each part of the card which ended up fueling my creative juices! Here are the symbolism’s that I wove into the card:

  • The Lemon Lime Twist gives a bright and cheerful background  to the card that reminds me of her big smile.
  • The softness of the Pink Pirouette speaks to the kindness of my dear sweet friend.
  • The gold allowed me to use the Gold Metallic thread to represent how she added richness to the tapestry of my life.
  • The Metallic Enamel Shapes represent two things; the heart represents how much I love her, and the other represent my tears.

Blending With The Stampin’ Blends

I used the Stampin’ Blends to color those gorgeous flowers.  However, since we don’t carry Stampin’ Blends in Lemon Lime Twist or Sweet Sugarplum, I had to blend other colors together to achieve a coordinated color scheme.

My first challenge was to obtain a color that coordinated with Lemon Lime Twist. In order to do that I used the light Old Olive and the Light Daffodil Delight Stampin’ Blends. The blend is almost a perfect match, don’t you think? For my second blending challenge of coordinating Sweet Sugarplum, I chose Pink Pirouette light and dark along with a touch of Rich Razzleberry light.  This resulted in an almost exact match to the Sweet Sugarplum that I used on the sympathy sentiment. On the whole, I am pleased with how the blending turned out. I also discovered that the Stampin’ Blends have a smooth and easy glide when coloring with them.  Therefore, I can’t wait to play with them some more! To learn more about the Stampin’ Blends, click here.

If you would like to duplicate this card, you may purchase any of the supplies used to create this card from my online store.

Happy Shopping @inkheaven
Thank you for shopping with me @inkheaven


Thank you for stopping by. Please leave a comment if you liked my sympathy card.

Darla Olson at inkheaven wishing you stamping happiness always

5 Things to Know About the Stamparatus Video! Reserve Yours Now!

Stamparatus, a new way to stamp

The Stamparatus is an innovative stamping tool!

It’s big news when something breaks the mold and changes everything. The Stamparatus will change the way you stamp, watch the 5 Things to Know About the Stamparatus video below to see how.

The response to the first reservation window was amazing! Can you believe that the first window reached its maximum number of reservations in just 15 minutes? Wow! As a matter of fact, the response was so amazing that Stampin’ Up! decided to make some important adjustments to the reservation process:

As was previously announced, the second reservation window will remain open from December 5–30; however, during this reservation period we will take as many orders as we receive* (yay!) and not close the window until December 30. So whether the total number of reservations is 100 or 100,000, the window will stay open!

Why do YOU need one? You’ll fall in love with stamping all over again when you learn everything you can do with it (see it in action in the 5 Things to Know About the Stamparatus Video below)!

  • Make multiples with ease
  • Consistently stamp crisp, clean images
  • If you want a darker impression, apply more ink and restamp—no need to start over
  • Make fewer mistakes, saving time and money
  • Easily create 2-step, 3-step, and 4-step stamped images using reversible plates
  • Develop new and specialized stamping techniques with adjustable stamping plates and precision placement

I need Stamparatus details! (See them in Stamparatus Video)

  • Compatible with Stampin’ Up!’s red rubber and photopolymer stamp
  • Foam mat to use with photopolymer stamps
  • Rulers and gridlines for quick measuring
  • 2 open sides so you can stamp on larger paper
  • 2 reversible plates: a total of 4 surfaces to work with
  • 2 magnets to hold the paper in place
  • Magnet storage areas
  • Retail Price–$49.00 USD/$65.00 CAD

5 Things to Know About the Stamparatus Video!

OKAY. I’VE GOTTA HAVE ONE. HOW DO I GET IN LINE?

Even with the updated reservation process, there is a line! Reserving your Stamparatus is a FIFO! (First order in, first order out!) The first reservation window was while supplies last. For the second reservation window, we are not limiting the maximum number of reservations we will accept. The reservation window will stay open from December 5-30. Here is some additional information regarding the 2nd (and last) reservation window:

  •  For the second reservation window, the limit is 1 tool per demonstrator and 1 tool per customer.
  • If you participated in the first reservation window, you may also participate in the second reservation window.
  • In order to reserve your Stamparatus, you are required to provide your credit card information.
  • Credit cards will not be charged until the Stamparatus ships from our facility. When you close your order, be sure to verify that your credit card and shipping information is correct.
  • Product dimensions are 8″ x 8″ x 7/8″.
  • Shipping begins March 19, 2018. Depending on the number of reservations we receive, we may stagger available-to-ship dates. You will receive additional communication once you place your reservation.
  • If you don’t get your Stamparatus reserved now – you will have to wait until June 2018 when the new Annual Catalog goes live.
  • You will be given an opportunity to add to your Stamparatus order in March before it ships – so you will be able to earn FREE Sale-a-bration items!

How to Reserve Your Stamparatus

In four easy steps: Click here for a printable tutorial that you can refer to during the reservation process (If you do not have a customer account, you will need to create one first!)  Click the Shop Here Now  button below – there will be a section that features the Stamparatas (scroll down the page – it will be under the Year End Sales Event banner on the right hand side). Go ahead and click to reserve!

Thank you for shopping with me @inkheaven.

Thank you so much for stopping by and visiting  with me. Come back soon!

Darla Olson at inkheaven wishing you stamping happiness always

Year-End Sales Event And Carry Over List Are Here!

Good-bye 2017 Year-End Sales Event

The countdown to year-end deals and discounts has begun!

The Year-End Sales Event is our chance to do a little inventory cleaning—and your opportunity to take advantage of special year-end deals on retiring and surplus items.  This promotion features a selection of items that are last-chance and limited-inventory. With this in mind, be sure to get your orders placed right away! Read below for more information about the promotion:

Promotion Dates: December 1, 2017–January 2, 2018

Details

  • All order types qualify for this promotion.
  • No minimum purchase required.
  • Discounts apply to select items only.
  • Retiring items from the 2017 holiday catalog are available while supplies last.
  • Excess items from 2017 annual catalog are available in limited quantities at the promotional price.
  • Discounted items may be added to a Starter Kit—or purchased with Stampin’ Rewards—at the promotional price. Click here to learn more about becoming a demonstrator.
  • Items and discounts may vary by market (depending on inventory levels).
  • Host sets may only be purchased using Stampin’ Rewards from a qualifying party.
  • Due to high demand for retiring stamps, we’ll keep producing retiring stamps until December 21 (not accessories—accessories are only while supplies last).

Order Deadlines

  • Phone: January 2, 2018, by 6:50 PM (MT)
  • OEX/Online: January 2, 2018, by 11:50 PM (MT)
Happy Shopping @inkheaven
Thank you for shopping with me @inkheaven


RETIRING AND SURPLUS ITEMS LIST

For those of you who like print and paper to reference, here is a list for you to download and print! Click Here For List.

Carryover List for the 2017 Holiday Catalog

The sales period for the 2017 holiday catalog ends on January 2nd. However, that doesn’t mean you have to say goodbye just yet!

We’re carrying over some of the catalog’s most popular items. Because of this, items from the 2017 holiday catalog carryover list will be available until May 31, 2018.  (After this date, items will either appear in the 2018–2019 annual catalog or be retired.)

Click here for the list!

Thank you for stopping by to visit. Come back soon!

Darla Olson at inkheaven wishing you stamping happiness always

Are you ready for Cyber Monday and FREE SHIPPING?

via GIPHY

Get READY for FREE SHIPPING on all Stampin’ Up! orders on Cyber Monday!

The introvert in me does not like crowds. As a result, I am more of a Cyber Monday shopper than I am a Black Friday shopper.  So when Stampin’ Up! made this announcement, I had to do a happy dance!

We are celebrating Cyber Monday by offering free shipping on every order placed for 24 hours. Get excited, our warehouse is ready and waiting!

ONE DAY ONLY, November 27th – 24 hours of FREE Shipping! 12 am – 11:59 pm MT

I’ve got my list of supplies ready to order and SNAIL Refills are at the top of it! Whisper White cardstock is 2nd! What is on your list?

It’s a great time to get those large ticket items!

Monday will be the perfect day to get those large ticket items that you have had your eye on! Personally, I have had my eye on the Large Letters framelit dies  and I think it may be time to get them! In addition, the Large Numbers framelit dies are on sale right now during Online Extravaganza (you can learn more about that here), which ends on Sunday!

Which of these large ticket items are on your Christmas Wish list? Let your Santa know about this fabulous sale so you can find your wish list under the tree!

Sweeten the pot by making it a $150 order with Host Rewards!

Did you know that if you place a $150 order (or more) that you will get an additional 10% in Host Rewards? Tell Santa that you have been really good this year (I hope you can say that) and let him know that shopping with me on Cyber Monday will give his elves and reindeer a much needed break! Head on over to my online store now and get your list ready for Santa!

Happy Shopping @inkheaven
Thank you for shopping with me @inkheaven

Thank you so much for stopping by to visit with me. I hope Santa brings you what you want!

Darla Olson at inkheaven wishing you stamping happiness always

Online Extravaganza Exclusive Deals And 24 Hour Stamp Sale!

24 hour sale to kick off Online Extravaganza

Week Long Online Extravaganza Kicked Off Today!

Don’t pinch yourself! I assure you, this isn’t a dream. For 24 hours only, select stamp sets from the 2017-2018 annual and 2017 holiday catalogs are 20% off during Online Extravaganza. This is a limited time offer, so don’t wait to place your order!

Did you miss out on some bundle and save offers in the last catalog? Check out the 20% off stamps that are on sale today – and then check out the dies and punches that are on sale as well! You just might be able to get as good a deal or better on them right now!

One example is the Number of Years Stamp Set! This set is 20% off today and the Large Number Framelit Dies are 10% off – that is a total of 30% off! Here is a downloadable Extravaganza sale flyer:  Sale Flyer (US)

You can also shop online and place your orders online here:

Happy Shopping @inkheaven
Thank you for shopping with me @inkheaven


5 Reasons to Join My Team During Extravaganza!

  1.  You will save an additional 20% on Extravaganza items!
  2.  In December you will save an additional 20% on Spring Catalog product while earning FREE Sale-a-bration products
  3. Be on board for our biggest selling season of the  year , Sale-a-bration.  It is a great way to earn your kit investment back and some extra income.
  4. Be part of our year long 30th anniversary party and the surprises Stampin’  UP! will be celebrating with all next year!
  5.  I will start training you right away setting you up for success during Sale-a-bration! Learn more, click here!

Thank you for stopping by to visit! Happy shopping!

Darla Olson at inkheaven wishing you stamping happiness always

The Stamparatus Will Change The Way You Stamp!

Stamparatus, a new way to stamp

Stamparatus is Big News!

It’s big news when something breaks the mold and changes everything. The Stamparatus will change the way you stamp, and before long, you’ll wonder how you crafted without it! Reservations start Thursday, November 16th at 2 pm MT (3 pm CST)!

Why do YOU need one? You’ll fall in love with stamping all over again when you learn everything you can do with it!

  • Make multiples with ease
  • Consistently stamp crisp, clean images
  • If you want a darker impression, apply more ink and restamp—no need to start over
  • Make fewer mistakes, saving time and money
  • Easily create 2-step, 3-step, and 4-step stamped images using reversible plates
  • Develop new and specialized stamping techniques with adjustable stamping plates and precision placement

I need Stamparatus details!

  • Compatible with Stampin’ Up!’s red rubber and photopolymer stamp
  • Foam mat to use with photopolymer stamps
  • Rulers and gridlines for quick measuring
  • 2 open sides so you can stamp on larger paper
  • 2 reversible plates: a total of 4 surfaces to work with
  • 2 magnets to hold the paper in place
  • Magnet storage areas
  • Retail Price–$49.00 USD/$65.00 CAD

Watch Stamparatus in Action!

OKAY. I’VE GOTTA HAVE ONE. HOW DO I GET IN LINE?

The global launch will feature three reservation windows. For each window, please note the following:

  • Reservation quantities are while supplies last.
  • Limit is 3 tools per demonstrator  and 1 tool per customer per reservation window. (Note: The Stamparatus is not a Cash-and-Carry item.) JOIN MY TEAM TO RESERVE MORE THAN ONE!
  • You and your customers may participate in multiple reservation windows.
  • In order to reserve your Stamparatus, you are required to provide your credit card information.
  • Credit cards will not be charged until the Stamparatus ships from our facility. When you close your order, be sure to verify that your credit card and shipping information is correct.
RESERVATION WINDOWS AVAILABLE TO SHIP
November 16–30, 2017 Approx. February 1, 2018
December 5–30, 2017 Approx. March 19, 2018
January 15–30, 2018 Approx. April 15, 2018

How to Reserve Your Stamparatus

In four easy steps: Click here for a printable tutorial.

Stamparatus Launch Q&A

Have more questions? Click here for a printable Q&A.

Create Your Customer Account Now!

If you do not have a Stampin’ Up! customer account yet, create one right now so you will be all set and ready to reserve your Stamparatus! Click the Shop Here Now to create your customer account!

Happy Shopping @inkheaven
Thank you for shopping with me @inkheaven


Thank you so much for stopping by and visiting with me.

Darla Olson at inkheaven wishing you stamping happiness always

Carols of Christmas Sings Peace on Earth

Carols of Christmas Peace on Earth Christmas card

Create a Peaceful Scene With Carols of Christmas

Don’t you just love the peaceful scene on this card created with the Carols of Christmas bundle? I can almost see the deer’s ears twitching as it senses me watching him!  Furthermore, the scene on this card is perfect for the Peace on Earth sentiment which comes in the bundle.  Also, if you listen carefully with your eyes, and imagination, you can almost hear this card sing, “peace on earth!”

For me, there is nothing more soothing than being out in nature. The sound of critters going about foraging and the serenity of the stillness when they are bedded down,  are both things that calm my spirit.  Big cities like Colorado Springs tend to drown out the soothing sounds of nature. For this reason, I really miss the bike trail in Waverly, Iowa, back near my hometown.  The trail is alive with the sounds of nature! Plus, biking it is good exercise!

Carols of Christmas Inspiration and Creation

Inspiration for this card was taken from on of our demonstrator publications called, “Stampin’ Success.” This publication is filled with inspiration, techniques, and class ideas.  If you would like to receive this awesome publication, all you need to do is join my team!  You can read more about that opportunity here.

Since I love nature so much, I fell in love with the card immediately.  However, the original card design used designer series paper for the background.   Unfortunately, background paper is not very practical for a large number of make and takes, so I needed to use a different design element. Thankfully, the Carols of Christmas stamp set included those nifty little stars! The stars were perfect for creating a background with repetitive stamping.  The background of stars is stamped in black ink on Crumb Cake for a woodsy, night-time feel. In addition, I accented the stars with Black Rhinestone Jewels. I have a tutorial for this card, complete with instructions and a supply list: Click Here for Tutorial

Need the supplies to create this card? I would appreciate your business and the opportunity to be your Demonstrator!

Happy Shopping @inkheaven
Thank you for shopping with me @inkheaven


Thank you so much for stopping by and visiting me!

Darla Olson at inkheaven wishing you stamping happiness always

Color Me Happy With Stampin’ Blends!

Color me happy stamp set is perfectly designed for use with the Stampin' BlendsColor me happy kit is easy and cute


Bundle and Save 10% With The Color Me Happy Bundle

Bundle and save! Buy these two coordinating products in the Color Me Happy Bundle and save 10%:

Color Me Happy Stamp Set 

You’ll be colored happy every time you create with this stamp set. Don’t delay purchasing the Color Me Happy Project Kit as it will only be available while supplies last! In conjunction with the kit, the stamp set will be available as long as kit supplies last. The line-art images are perfect for learning coloring techniques using the Stampin’ Blends!

Click here to learn more

Color Me Happy Project Kit

Color everyone happy when they get one of these cards! Kit includes enough supplies for 16 cards, 4 each of 4 designs. Ink and adhesive sold separately.

Kit includes:
• 16 card bases, 4 each of 4 designs
• 16 envelopes with printed design inside, 4 each of 4 designs
• Gold foil accents
• Die-cut cardstock background and accents
• Printed and gold foil die-cut accents
• White Baker’s Twine
• Mini Pool Party tassels
• Circle and star sequins
• Gold foil tape

Coordinating colors in the kit are:

Basic Black, gold foil, Night of Navy, Pink Pirouette, Pool Party, Pumpkin Pie, and Rich Razzleberry

Completed Projects From the Kit

Completed Color Me Happy Bundle Projects
Click here to purchase the bundle.


Color Me Happy Card Kit Using Stampin’ Blends Video

Watch this video for tips on using the Stampin’ Blends and assembling the cards in your kit.

Darla Olson at inkheaven wishing you stamping happiness always

Merry and Bright Christmas Card With Winter Wonder

Merry and Bright Christmas Card created with Winter Wonder Stampin' Up!

Merry and Bright Christmas Card Cased From Stampin’ Up!’s Holiday Catalog

Isn’t this Christmas Card just gorgeous? I love simple WOW cards and this Merry and Bright Christmas Card falls into that category! This card started out as a CASE (Copy and Share Everything) of the “cheers to a new year!” card on the bottom of page 36 of the 2017 Stampin’ Up! Holiday Catalog. (If you don’t have a catalog you can find out how to get one by clicking here.) As I got to work on the card it quickly became apparent that I needed to make some changes! Here’s why:

  • Cheers to the Year stamp set was not in my stamp collection! (I know. I know! What was I thinking?)
  • Heat embossing was out of the question because I needed it to be quick for a Make and Take!
  • Simple is good but sometimes just adding a simple layer adds to the wow factor.

So, what do you do when you see a card you want to copy and you don’t have the sentiment? Pull out what you do have and find an alternative.  Or order what you need, wink, wink – but I didn’t have time for that – I was working with a deadline!

The Process of Casing a Christmas Card With What You Have

Since I did not have time to order the Cheers to the Year stamp set, I needed to figure out if I could CASE the Christmas Card with what I had on hand.  Since I knew I wanted to add a layer to the card, I started with that. Once I measured, cut, and embossed my layer, then I was able to determine the best size for my circle layers. TIP: The easiest way to do this is to have the Layering Circle Dies cut out in copy paper (just store these with your dies) so you can lay them over your card front and visually see what will look good. No need to waste that precious (and gorgeous) Designer Series Paper! I also have the Lowdown on the sizes of the Layering Circle Framelit Dies that you can download here.

After you have determined the size of your circles, the next step is to take the one that you will be stamping the sentiment on and using it to find a sentiment in your collection of stamps that will fit. I already had an idea of what I wanted to use so I pulled out my Hearts Come Home Bundle, much to my delight (and relief) the “merry & bright” sentiment was a perfect fit!

FREE Inkheaven Tutorial for the Merry and Bright Christmas Card

Since this card was created as a Make and Take for my Holiday Catalog Launch, I put together a tutorial complete with supply list for my attendees. To celebrate my new blog and return to blogging, I will be sharing more Make and Takes, Class Cards, and Tutorials for you to download over the next few weeks so be sure to check back!

Click here to download FREE Inkheaven Tutorial

Thank you so much for visiting my blog today! If you enjoyed this project and would like to duplicate it, please be sure to purchase the products you need from my online store.

Happy Shopping @inkheaven
Thank you for shopping with me @inkheaven


Please come and visit me again as I will be creating more stamping happiness for you soon!

Darla Olson at inkheaven wishing you stamping happiness always


Moving Boxes or Boxes of Stamps?

Moving Boxes

Moving Boxes or Boxes of Stamps?

Uh, boxes of stamps, please! Moving is hard! About the time I was in the middle of re-launching inkheaven we found out that my husband, Jim was unemployed. I managed to launch inkheaven but as you can see, I have not posted much. Between staging our home, putting it on the market, getting it sold,  preparing for Holiday Catalog launches, classes, workshops, packing everything up in boxes, and moving to Colorado Springs – finding the time to post has been next to impossible! (Phew! That was a mouthful!)

Other Ways To Stay In The Know

I have managed to stay in touch and keep everyone up-to-date via email and my Facebook page though, so if you don’t want to miss out on anything be sure to like my Facebook page here and sign up for my newsletter (you can fill out the form on the right side of this page)!  If you are not familiar with our catalogs, you can learn more about the Holiday Catalog and how to get your own copy here.

More Posts Are On The Way!

I do plan on bringing you up-to-date here and sharing all the projects that I created for my Holiday Catalog Launches (I did one in Cedar Falls, Iowa and one in Le Mars, Iowa). I would love to do one here in Colorado Springs but I am still in the middle of unpacking boxes! My first catalog launch here in Colorado Springs may have to be for our upcoming 2018 Occasions Catalog! We will see how the settling in saga goes! My youngest son (who has graciously taken us into his home), is finishing the basement of his home so I will have a stamp room/guest room. It’s a work in progress…

So, while I wait, I will set up a small temporary stamping area and get back to blogging. I need to get more familiar with with the new blogging platform anyway!

Darla Olson at inkheaven wishing you stamping happiness always

You can order the 2017-2019 In Color Collection today!

All five of the brand new In Colors are here!

Introducing the Complete 2017-2019 In Color Collection!

Every year, Stampin’ Up! introduces 5, highly anticipated, fresh new colors to update our color line with a new In Color Collection! These new  colors represent new trending colors found in fashion and home decor! Our In Colors this year are: Berry Burst, Fresh Fig, Lemon Lime Twist, Powder Pink, and Tranquil Tide!

The new catalog (see the new catalog and download your free PDF copy here)  goes live today at Noon MT which means that you can order a complete set of of these fabulous new colors today! We have ink pads, markers, card stock, ribbons, and designer series paper available in all of these gorgeous new colors!

Update your collection of colors by placing your order on my 24/7 online store today!

Happy Shopping @inkheaven
Thank you for shopping with me @inkheaven


Watch for New Color Combinations!

Be sure to check back with me here frequently at inkheaven as I will be sharing plenty of new color combinations that will include our core color line and our new In Color Collection! Also, be sure to sign up for the Inkheaven Newsletter as my subscribers will be getting all kinds of fabulous documents/tools in their email inbox to download! Sign up using the sign up form in the side bar to the right! I am always looking for ways to create stamping happiness for you!

Darla Olson at inkheaven wishing you stamping happiness always

Creativity Starts Here With Paper Pumpkin at 25% Off!

Get paper pumpkin at 25% sign up now at inkheaven

FIRST-TIME subscribers enjoy three months at 25% off!

Does any of this sound familiar?

  • I want a creative escape but I don’t have a lot of time.
  • I’m not sure I’m ready to commit to papercrafting, but I want to try it.
  • I love to create but I don’t always feel creative.
  • I need some fresh project ideas.
  • How can I craft when I don’t have all the “crafting stuff” I need?

These statements are what inspired this Creativity Starts Here Promotion! If you find yourself saying things like this then you will love the Paper Pumpkin!  Because with our kits, you have everything you need in one box. You’ll get:

  • An expertly-designed project
  • All the supplies to complete the project, pre-cut and ready to go
  • Step-by-step instructions (including a video)
  • Something new and different every month

Paper Pumpkin Offer Details

Offer Dates: May 11–June 10
  • For first-time subscribers only.
  • Subscribers must join by Saturday, June 10, 2017; 11:50 PM (MT).
  • Available for month-to-month subscriptions, not prepaid subscriptions.
  • Discount applied to one kit per month for the first three months of a new subscription. After that, the price for each month’s kit will return to the regular price of $19.95 US/$26.95 CA.
  • Enter the promo code, STARTHERE, at PaperPumpkin.com to subscribe.
Paper Pumpkin is a fabulous monthly kit for new papercrafters! Don’t forget to use the promo code, STARTHERE when you subscribe!

Happy Shopping @inkheaven

Thank you for shopping with me @inkheaven


Darla Olson at inkheaven wishing you stamping happiness always

Watercolor Pencil Technique is Gorgeous With Special Reason

Watercolor Pencil technique with Special Reason Inkheaven

Watercolor Pencil Technique provides depth and texture to stamped images.

The Special Reason stamp set is perfect for this watercolor pencil technique.  I am not a big fan of spending a lot of time coloring images. I don’t know why it is, but I lose interest quickly. Even as a child I don’t recall completing entire pages in my coloring books very often. As a result, this technique suites me well as the Watercolor Pencils are used primarily to enhance an already stamped image!

Tips, Tricks, and Techniques

Since I have not used this Watercolor Pencil Technique with other stamp sets yet, I can only share how it worked with the Special Reason stamp set. When I first attempted this technique, I found that inking up the image and stamping it made it too dark. I then tried stamping off, but I didn’t like that result either.  Ultimately, I settled on using a stamping sponge to apply the ink to the stamp to get the desired look. Even when using the stamping sponge to ink up the stamp, you have to be careful to not over apply the ink!

Another technique used on this card is masking. As the name implies, images are covered in this technique to achieve a desired look. In this instance, masking is used to place part of the leaves behind the flower.  I created the mask for the flower using the Stylish Stems dies with post-it notes. (The Stylish Stem Dies are no longer available. However, a mask can be created by fussy cutting around a stamped image.). To keep the gap between the flowers and the leaves from being too big, be sure to leave an edge of the flower showing. The mask needs to be re-positioned for each leaf. Once again, I found that stamping the image fully inked was too much, so the leaf is stamped off once before stamping on the card.

How the Technique is Done

Choose complimentary Watercolor Pencils to shade your images. Shading is done is layers with the darkest layer added last. Once the desired shading has been done, the shading is blended with a blender pen.

If you are local be sure to sign up for my creative classes of happiness for hands on learning! Creative classes of happiness will also be an online feature once I am done moving and settled!

Supplies used for this card project

Special Reason stamp set, Suite Sentiments stamp set, Very Vanilla cardstock, Stitched Shapes Framelits,  Calypso Coral ink and cardstock,  Petal Burst folder,  Blushing Bride 3/8″ stitched satin ribbon, Stamping Sponges, Watercolor Pencils, Chocolate Chip Marker, Pear Pizzazz ink, Blender Pens.

Thank you so much for visiting my blog today! If you enjoyed this project and would like to duplicate it, please be sure to purchase the products you need from my online store.  Please note that after May 22nd, the Special Reason stamp set will only be available while supplies last as it is being retired! Thank you so much for your support!

Happy Shopping @inkheaven
Thank you for shopping with me @inkheaven


Please come and visit me again as I will be creating more stamping happiness for you soon!

Darla Olson at inkheaven wishing you stamping happiness always